
If you have the question “how to replace shower faucet,” you’re not alone. Many homeowners face the challenge of dealing with a worn-out or outdated shower fixture at some point.
By the end, you’ll be well-equipped to refresh your shower and elevate your bathroom experience.
How To Replace Shower Faucet in 202 Overview
Table of Contents
Gather Your Tools and Materials
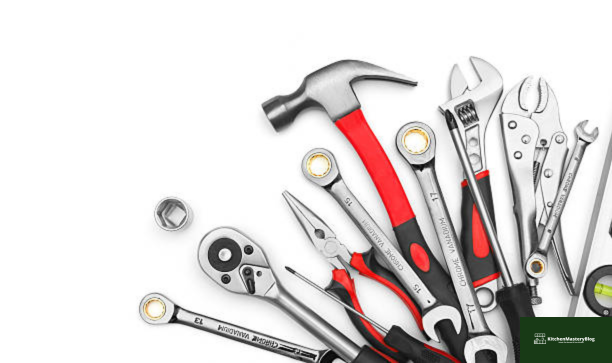
Before embarking on the journey of replacing your shower faucet, it’s crucial to ensure you have all the essential tools and materials within reach.
A well-prepared toolkit will not only streamline the process but also enhance your confidence in tackling the project effectively. Here’s a detailed breakdown of the items you’ll require:
Tools:
Adjustable Wrench: This versatile tool is indispensable for adjusting and securing various nuts and bolts during the faucet replacement procedure. Look for a sturdy wrench with a wide jaw opening to accommodate different-sized fittings.
Screwdrivers: Invest in a quality set of screwdrivers, including both flathead and Phillips head types. These will be indispensable for removing screws securing the old faucet and installing the new one.
Pipe Wrench: If your shower faucet connects to copper pipes, a pipe wrench will be essential for disconnecting the old faucet from the water supply lines. Opt for a wrench with a strong grip and adjustable jaws for versatility.
Pliers: Having a pair of pliers on hand will aid in gripping and maneuvering small components during installation, ensuring a secure fit.
Flashlight: Illuminate tight spaces behind the shower wall with a reliable flashlight. Look for a compact, durable model with adjustable brightness settings for optimal visibility.
Utility Knife: A utility knife will prove invaluable for cutting through any existing caulking or sealant around the old faucet, facilitating its removal without causing damage to surrounding surfaces.
Plumber’s Tape: Also known as Teflon tape, plumber’s tape is essential for creating a watertight seal on threaded connections, preventing leaks and ensuring long-term durability.
Materials:
- New Shower Faucet Kit: Selecting the right shower faucet kit is paramount to the success of your project. Ensure it includes all necessary components, such as faucet handles, a spout, valve, trim plate, and any additional hardware required for installation.
- Caulk or Sealant: Choose a high-quality caulk or sealant compatible with your shower’s materials to create a watertight seal around the edges of the new faucet and any gaps between the faucet and the shower wall.
- Safety Glasses: Protect your eyes from debris and splashes during the installation process with a pair of safety glasses. Opt for a comfortable, ANSI-certified pair with impact-resistant lenses for maximum safety.
Recommended Products

- Adjustable Wrench: Introducing the Amazon Basics Locking Adjustable Wrench, measuring 10 inches by 2.7 inches by 0.75 inches. This versatile tool offers durability and ease of use, making it an essential addition to your toolkit for various plumbing tasks. Invest in quality and reliability with Amazon Basics.

- New Shower Faucet Kit: Discover the Delta Faucet Arvo 14 Series Single-Handle Shower Faucet, complete with a Shower Trim Kit featuring a 4-Spray In2ition 2-in-1 Dual Hand Held Shower Head with Hose in elegant Matte Black. With the valve included, upgrade your shower experience with style and functionality from Delta Faucet. Read here our whole blog about this Shower Faucet
Turn Off the Water Supply
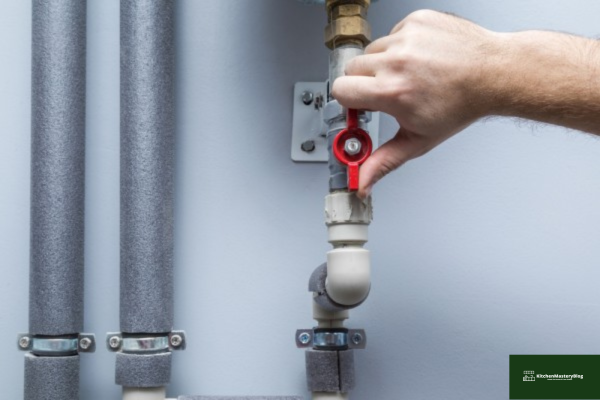
Before beginning the process of replacing your shower faucet, it’s imperative to turn off the water supply to the shower.
This step ensures safety and prevents any water damage or unexpected leaks during the installation. Follow these simple steps to turn off the water supply effectively:
Locate the Water Shut-Off Valve: The water shut-off valve for your shower may be located in different places depending on your home’s plumbing setup. Common locations include the basement, utility closet, or near the water heater. Look for a valve labeled specifically for the shower or bathroom.
Turn Off the Valve: Once you’ve located the water shut-off valve, use your hand or an appropriate tool, such as a wrench, to turn the valve clockwise (to the right) until it stops. This action shuts off the flow of water to the shower, preventing any water from entering the faucet during the replacement process.
Test the Water Supply: After turning off the water supply, it’s a good idea to test the faucets in the shower to ensure that the water flow has indeed been cut off. Turn on the shower faucet handles to verify that no water is coming out. If water continues to flow, double-check that the valve is fully closed.
Drain Any Remaining Water: Even after turning off the water supply, there may still be some residual water in the pipes. To prevent spills and make the replacement process easier, open the shower faucet handles to allow any remaining water to drain out completely.
Recommended Products:

- Water Shut-Off Valve Key: Introducing the Eapele Water Meter Key, featuring a sturdy 16-inch enforced steel T-handle and a 4-way multi-functional universal cross key design. This versatile tool provides easy access to water shut-off valves, ensuring a hassle-free experience when turning off the water supply for faucet replace

- Plumbing Wrench Set: Introducing the KOTTO Heavy Duty Adjustable Pipe Wrench Set, a versatile hand tool kit perfect for plumbing tasks. This 3-pack set includes wrenches in 8, 10, and 12 inches, offering flexibility and durability for various pipe sizes. Complete with a convenient storage bag, it’s an essential addition to any toolb
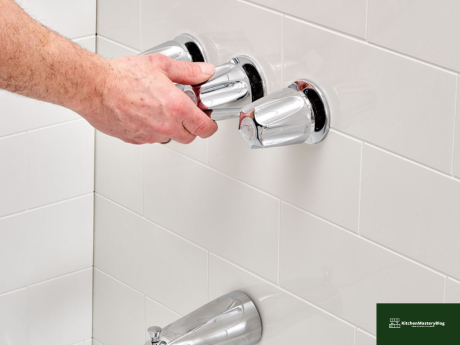
Remove the Old Faucet
Removing the old faucet is a crucial step in the process of replacing your shower faucet.
Follow these step-by-step instructions to effectively remove the old fixture and prepare for the installation of the new one.
Remove the Faucet Handles: Start by removing the faucet handles. Depending on the type of faucet you have, this may require unscrewing a decorative cap or cover to access the screws underneath. Once exposed, use a screwdriver to loosen and remove the screws holding the handles in place.
Detach the Trim Plate: If your faucet features a trim plate or escutcheon, remove it by unscrewing any visible screws or bolts securing it to the wall. Carefully pry the trim plate away from the wall, taking care not to damage the surrounding tiles or surface.
Disconnect the Water Supply Lines: With the handles and trim plate removed, locate the water supply lines connected to the faucet. Use an adjustable wrench to loosen the nuts or connectors securing the supply lines to the faucet. Once loosened, carefully disconnect the supply lines, taking note of any residual water that may drain out.
Unscrew the Faucet Body: With the water supply lines disconnected, use a wrench or pliers to unscrew the faucet body from the shower wall. Turn the faucet body counterclockwise to loosen it from the mounting hardware behind the wall. If necessary, use a utility knife to cut through any caulking or sealant around the base of the faucet to facilitate removal.
Inspect the Area: Once the old faucet is removed, take a moment to inspect the area behind the wall for any signs of damage or corrosion. Clean the area thoroughly to prepare for the installation of the new faucet.
Recommended Products:

- Plumbing Pliers: Introducing the CRAFTSMAN Pliers 2-Piece Groove Joint Set, featuring 8 and 10-inch pliers designed for versatility and durability. With their precision jaw alignment and comfortable grip handles, these pliers are perfect for removing stubborn faucet components during your shower faucet replacement project.
Inspect and Clean the Area

After removing the old faucet, it’s essential to inspect the area behind the wall and ensure it’s clean and ready for the installation of the new shower faucet. Follow these steps to inspect and clean the area effectively.
Inspect for Damage: Carefully examine the area behind the wall where the old faucet was installed. Look for any signs of damage, such as water stains, mold, or corrosion. If you notice any damage, it’s essential to address it before proceeding with the installation of the new faucet.
Repair any Damage: If you discover any damage during the inspection, take the necessary steps to repair it. Depending on the extent of the damage, this may involve patching holes in the drywall, replacing damaged tiles, or addressing any plumbing issues that may have contributed to the damage.
Clean the Area: Once you’ve inspected the area and addressed any damage, it’s time to clean the area thoroughly. Use a damp cloth or sponge to wipe down the walls and surrounding surfaces, removing any dust, dirt, or debris. Pay special attention to any remaining caulking or sealant from the old faucet, ensuring it’s completely removed to provide a clean surface for the new installation.
Allow the Area to Dry: After cleaning, allow the area to dry completely before proceeding with the installation of the new faucet. This will ensure that the new faucet adheres properly to the wall and prevents any moisture-related issues down the line.
Recommended Products:

- Drywall Patch Kit: Introducing the WDSHCR Drywall Repair Kit, featuring 12 pieces of aluminum wall repair patches designed to tackle various drywall damage. With sizes ranging from 4 to 8 inches and extended self-adhesive mesh, this kit provides everything you need to patch holes and ensure a seamless finish before installing your new shower faucet.

- Tile Repair Kit: Introducing the Porcelain Repair Kit in White, a versatile solution for repairing porcelain, ceramic, fiberglass, and acrylic surfaces. This color-matched kit includes everything you need to seamlessly repair chips, cracks, and damage on bathtubs, sinks, tiles, and more, ensuring a flawless finish before installing your new shower faucet.
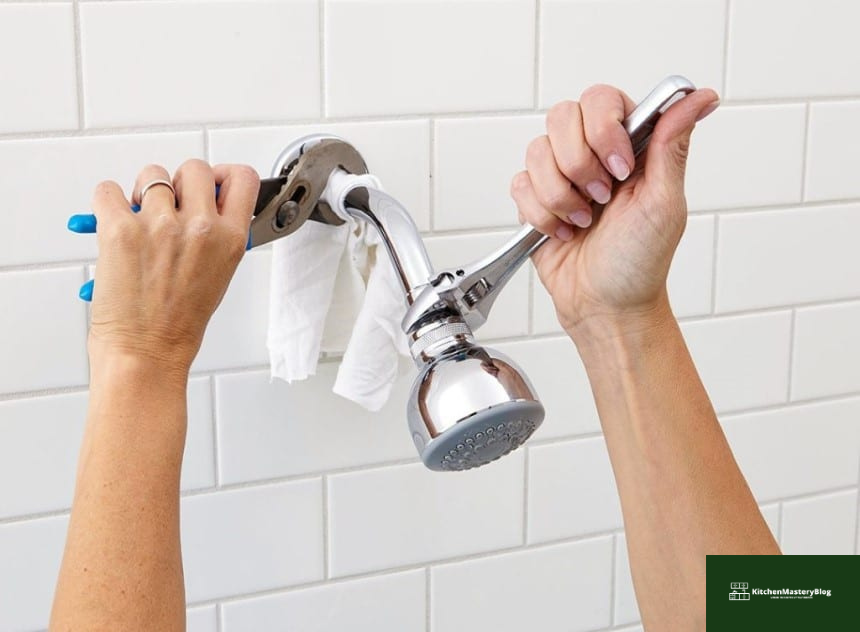
Install the New Faucet

Now that you’ve successfully removed the old faucet and prepared the area, it’s time to install the new shower faucet. Follow these step-by-step instructions to ensure a smooth and successful installation process.
Prepare the New Faucet: Before installing the new faucet, carefully unpack and inspect all components to ensure everything is included and in good condition. Review the manufacturer’s instructions to familiarize yourself with the installation process and any specific requirements for your faucet model.
Position the Faucet: Position the new faucet in the desired location on the shower wall, ensuring that it aligns correctly with any existing plumbing connections or mounting hardware. Use a level to ensure the faucet is straight and properly aligned before proceeding.
Connect the Water Supply Lines: Once the faucet is properly positioned, connect the water supply lines to the corresponding inlet ports on the faucet body. Use an adjustable wrench to tighten the connections securely, taking care not to over-tighten and risk damaging the fittings.
Secure the Faucet Body: With the water supply lines connected, secure the faucet body to the shower wall using the provided mounting hardware. Follow the manufacturer’s instructions for securing the faucet in place, ensuring it is firmly attached to the wall and stable.
Attach the Trim Plate: If your faucet includes a trim plate or escutcheon, attach it to the wall over the faucet body, covering any exposed mounting hardware. Secure the trim plate in place using the provided screws or bolts, ensuring a snug fit against the wall.
Install the Faucet Handles: Finally, install the faucet handles onto the faucet body, following the manufacturer’s instructions for assembly. Use a screwdriver to tighten any screws or bolts holding the handles in place, ensuring they are secure and operate smoothly.
Test the Faucet: Once the faucet is installed, turn on the water supply and test the faucet to ensure it functions correctly. Check for any leaks around the connections and handles, and make any necessary adjustments to ensure a watertight seal.
Seal the Edges: Once you’re confident that the faucet is installed correctly and functioning properly, use caulking or sealant to create a watertight seal around the edges of the faucet and any gaps between the faucet and the shower wall.
Recommended Products:

- Caulk Gun: Introducing the Bates Caulking Gun, designed for ease and precision in applying caulking or sealant during faucet installation. With a 10:1 thrust ratio and a no-drip design, this orange caulking tool ensures smooth and efficient application without the mess. Upgrade your caulking experience with the Bates Caulking Gun for a professional finish.
Test for Leaks
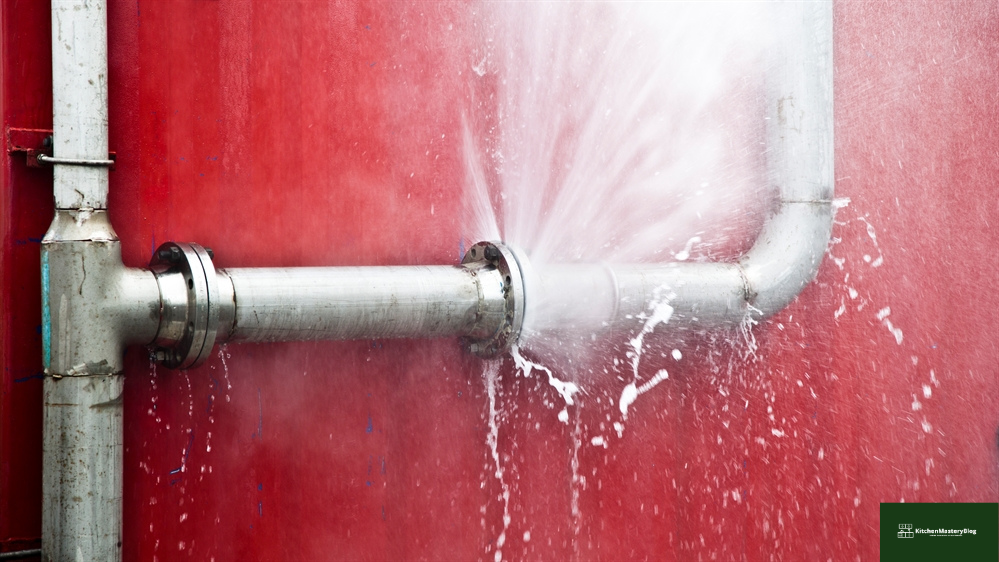
Once you’ve installed the new shower faucet, it’s crucial to test for leaks to ensure everything is functioning properly. Follow these simple steps to conduct a thorough leak test and address any issues that may arise.
Turn On the Water Supply: Begin by turning on the water supply to the shower. This will allow water to flow through the faucet and reveal any potential leaks in the system. Take note of any unusual sounds or visible signs of leaking as the water flows.
Check for Leaks Around the Faucet Handles: Start by checking for leaks around the faucet handles. Turn the handles on and off several times while closely inspecting the area where the handles meet the faucet body. Look for any water dripping or seeping out from the handles, indicating a potential leak.
Inspect the Faucet Spout: Next, examine the faucet spout for any signs of leaking. Run water through the faucet and observe the area where the water exits the spout. Look for any water dripping or pooling around the base of the spout, which could indicate a leak in the connection.
Examine the Connections: Inspect all connections between the faucet body, water supply lines, and any additional components, such as a showerhead or trim plate. Look for any signs of water leakage or moisture buildup around these connections, indicating a potential issue that needs to be addressed.
Test the Showerhead: If your faucet includes a showerhead, test it for leaks by turning on the water and allowing it to flow through the showerhead. Check for any water dripping or spraying from the showerhead when it’s turned off, as this could indicate a leak in the showerhead or its connection to the faucet.
Address Any Leaks: If you detect any leaks during the testing process, take immediate action to address them. Tighten any loose connections using an adjustable wrench and apply plumber’s tape to threaded connections to create a tighter seal. If necessary, consult a professional plumber for assistance in resolving more complex leaks.
Re-Test for Leaks: Once you’ve addressed any leaks, re-test the faucet to ensure the issue has been resolved. Run water through the faucet and check for any signs of leaking or dripping. Repeat this process as needed until you’re confident that the faucet is leak-free and functioning properly.
FAQ
How do I know if I need to replace my shower faucet?
Signs that indicate it may be time to replace your shower faucet include persistent leaks, corrosion or rust on the faucet components, difficulty turning the handles, or outdated design that you wish to upgrade. If you’re experiencing any of these issues, it’s a good idea to consider replacing your shower faucet.
Do I need to hire a professional plumber to replace my shower faucet?
While some homeowners may feel comfortable tackling a shower faucet replacement as a DIY project, others may prefer to hire a professional plumber to ensure the job is done correctly. If you have experience with plumbing tasks and feel confident in your abilities, you may be able to replace the faucet yourself. However, if you’re unsure or uncomfortable with the process, it’s best to enlist the help of a professional plumber to avoid potential complications.
How long does it take to replace a shower faucet?
The time it takes to replace a shower faucet can vary depending on factors such as the complexity of the installation, the condition of the existing plumbing, and your level of experience with plumbing tasks. In general, a straightforward faucet replacement can be completed in a few hours, while more complex installations may take longer. It’s a good idea to set aside ample time for the project and allow for any unexpected delays.
What tools and materials do I need to replace a shower faucet?
To replace a shower faucet, you’ll typically need basic tools such as an adjustable wrench, screwdrivers, plumber’s tape, and possibly a utility knife. You’ll also need a new shower faucet kit that includes all the necessary components for installation, such as the faucet handles, spout, valve, and trim plate. Additionally, you may need caulking or sealant to create a watertight seal around the edges of the faucet.
Can I replace my shower faucet with a different model or brand?
In most cases, it’s possible to replace your shower faucet with a different model or brand, as long as the new faucet is compatible with your existing plumbing setup. However, it’s essential to ensure that the new faucet has the same or similar dimensions and configuration as the old one to avoid any issues with installation. Additionally, consider factors such as style, functionality, and quality when choosing a new faucet to ensure it meets your needs and preferences.
What’s next?

Thank you for taking the time to read this blog. I hope you found the information and tips helpful.
Stay tuned for more informative articles and guides on kitchen mastery here at kitchenmasteryblog.com. We’ll be covering a wide range of topics, from knife skills to culinary techniques and everything in between.
We look forward to welcoming you back soon for more valuable insights and expertise to elevate your culinary journey. Happy cooking, and see you again on our next blog!