
Are you grappling with the nagging question, “How to fix a leaky bathtub faucet?” Look no further! In this comprehensive guide, we’ll provide you with expert insights and practical solutions to tackle this common household dilemma.
How To Fix A Leaky Bathtub Faucet in 2024- Full Guide in X Steps Overview
Table of Contents
Understanding the Problem: Identifying the Source of Your Bathtub Faucet Leak

Is the constant drip, drip, drip of your bathtub faucet driving you up the wall? Dealing with a leaky bathtub faucet can be frustrating, not to mention wasteful.
But fear not! By understanding the common causes of bathtub faucet leaks, you’ll be better equipped to tackle the issue head-on and get your faucet back to its leak-free glory.
- Types of Bathtub Faucet Leaks:
When it comes to bathtub faucet leaks, there are generally two main culprits: worn-out washers and faulty cartridges or valves.
- Worn-Out Washers: In older compression-style faucets, a rubber washer is used to create a seal and prevent water from flowing when the faucet is turned off. Over time, these washers can degrade, leading to leaks. Recommended Products: A set of assorted rubber washers suitable for bathtub faucets. Add a clear, close-up image of the washers to help readers identify the right product.
- Faulty Cartridges or Valves: In more modern cartridge-style faucets, a cartridge or valve regulates the flow of water. If the cartridge becomes worn or damaged, it can result in leaks. Recommended Products: A replacement cartridge or valve compatible with common bathtub faucet brands. Include a high-quality image showcasing the cartridge to assist readers in selecting the correct part.
- Tips for Identifying the Source of the Leak:
Now that you know the two main types of bathtub faucet leaks, it’s time to identify which one is causing the issue in your particular faucet.
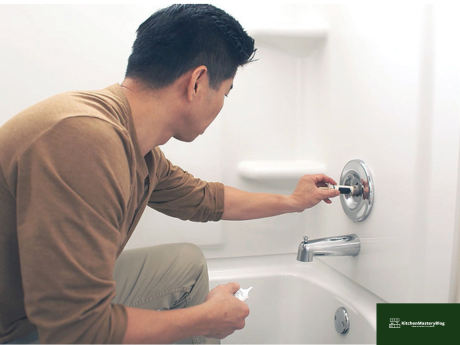
- Visual Inspection: Start by examining the faucet closely. Look for any visible signs of water pooling around the base of the faucet or dripping from the spout. This can help determine whether the leak is originating from the handles, spout, or base.
- Testing for Leaks: Turn on the faucet and observe its behavior. Does the leak occur only when the faucet is turned on, or does it persist even when the faucet is off? This can provide clues about the source of the leak and whether it’s related to the washers or the cartridge/valve.
- Consulting Manufacturer’s Instructions: If you’re unsure about the type of faucet or how to proceed with troubleshooting, refer to the manufacturer’s instructions. They often contain valuable information about common issues and recommended solutions.
Recommended Products: The PHIXTON Rechargeable Flashlight, boasting a remarkable 250,000-lumen super bright beam and USB-C rechargeability,

is the perfect companion for tackling bathtub faucet leaks. Its high beam LED ensures clear visibility during inspections, making it an essential tool for identifying and fixing leaks with ease.
By following these tips and understanding the common causes of bathtub faucet leaks, you’ll be well on your way to pinpointing the source of the problem and taking the necessary steps to fix it.
Essential Tools for the Job: Must-Have Equipment for Fixing a Leaky Bathtub Faucet
:max_bytes(150000):strip_icc()/top-plumbing-tools-1824860-hero-867cc1e34408463dbab86838f89e7762.jpg)
When it comes to fixing a leaky bathtub faucet, having the right tools on hand is essential for a successful repair.
From basic wrenches to specialized parts, here’s a breakdown of the must-have equipment you’ll need to tackle the job like a pro.
Adjustable Wrench:
An adjustable wrench is a versatile tool that allows you to loosen and tighten nuts and bolts of various sizes. It’s indispensable for removing the faucet handle and accessing the internal components of the faucet.

Recommended Products: This 3-piece set includes wrenches with wide opening jaws and soft grip handles, making them perfect for any task. With sizes ranging from 6-inch to 10-inch, this set offers versatility and comfort for all your repair needs.
Screwdrivers:
Different types of screwdrivers may be required depending on the design of your bathtub faucet. Phillips and flathead screwdrivers are commonly used to remove screws holding the faucet handle in place.

Recommended Products: The Fanttik E1 Max Mini Electric Screwdriver: This precision electric screwdriver boasts a 50-in-1 set of magnetic bits, perfect for various repair tasks.
With a maximum torque of 3 N.m and magnetic storage, it’s ideal for fixing phone cameras, laptops, watches, and more. Available in sleek grey.
Plumber’s Tape:
Plumber’s tape, also known as thread seal tape, is essential for creating a watertight seal when reassembling the faucet components. It helps prevent leaks by filling in any gaps between threaded connections.

Recommended Products: The DOPKUSS Plumbers PTFE Pipe Sealant Tape: This flex seal tape is waterproof and measures 1/2 by 520 inches, providing ample coverage for your plumbing needs.
With its durable PTFE material, it ensures a tight, leak-free seal for various pipe connections. One roll offers reliable performance for multiple projects.
Replacement Washers or Cartridges:
If your bathtub faucet leak is caused by worn-out washers or a faulty cartridge, having replacements on hand is crucial for completing the repair. Make sure to choose washers or cartridges that are compatible with your faucet model.
By ensuring you have these essential tools and supplies before starting the repair process, you’ll be well-prepared to tackle any bathtub faucet leak with confidence. Stay tuned for the next section, where we’ll provide a step-by-step guide on how to fix a leaky bathtub faucet using these tools.
Step-by-Step Repair Guide: How to Fix a Leaky Bathtub Faucet Like a Pro
Are you tired of the incessant drip from your bathtub faucet? It’s time to take matters into your own hands and learn how to fix a leaky bathtub faucet like a pro.
Follow this step-by-step guide, and you’ll have your faucet working smoothly in no time.
Turn Off the Water Supply: Before you start any repairs, it’s crucial to turn off the water supply to the bathtub. Locate the shut-off valves underneath the sink or near the bathtub and turn them clockwise until they are fully closed. This will prevent water from flowing while you work.
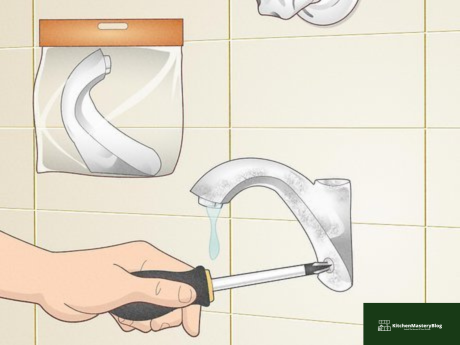
Remove the Faucet Handle: Using a screwdriver, carefully remove the screws or caps covering the faucet handle. Once exposed, unscrew the handle and set it aside. Be mindful of any small components that may fall out during this process.
Inspect and Replace Washers or Cartridges: With the faucet handle removed, inspect the internal components for signs of wear and tear. If you have a compression-style faucet, check the rubber washer for damage. For cartridge-style faucets, examine the cartridge for any defects. Replace any worn-out parts as needed.
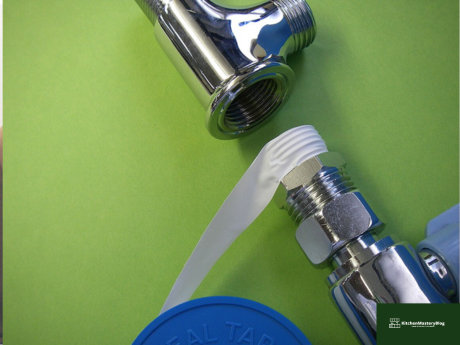
Apply Plumber’s Tape: Before reassembling the faucet, wrap plumber’s tape around the threads of the faucet stem. This will create a tight seal and help prevent future leaks. Make sure to wrap the tape in the direction of the threads to ensure a proper seal.
Reassemble the Faucet: Carefully reassemble the faucet in the reverse order of how you disassembled it. Make sure all components are properly aligned and tightened securely. Double-check that the water shut-off valves are still closed before proceeding.
Turn On the Water Supply: Once everything is reassembled, turn the water supply back on by reopening the shut-off valves. Slowly turn the faucet handle to test for leaks. If everything looks good, congratulations! You’ve successfully fixed your leaky bathtub faucet like a pro.
Tightening the Seals: Applying Plumber’s Tape to Prevent Future Leaks
When it comes to fixing a leaky bathtub faucet, proper sealing is essential to prevent future leaks from occurring. One effective way to achieve a watertight seal is by applying plumber’s tape.
Importance of Plumber’s Tape: Plumber’s tape, also known as thread seal tape or Teflon tape, is a thin, white tape used to seal threaded pipe connections. It creates a tight seal between threaded fittings, preventing water from leaking out. When applied correctly, plumber’s tape can significantly reduce the risk of future leaks, saving you time and hassle down the line.
Step-by-Step Guide to Applying Plumber’s Tape: Follow these simple steps to apply plumber’s tape effectively and prevent future leaks in your bathtub faucet:a. Prepare the Threads: Before applying plumber’s tape, make sure the threads of the faucet stem are clean and dry. Use a clean cloth to wipe away any dirt, debris, or old tape residue.
b. Wrap the Tape: Start by holding the end of the plumber’s tape against the first thread of the faucet stem. Hold the tape at a slight angle and wrap it around the threads in the direction of the rotation. Make sure to overlap the tape slightly with each turn to ensure a complete seal.
c. Apply Even Pressure: As you wrap the plumber’s tape around the threads, apply even pressure to ensure uniform coverage. Avoid stretching or tearing the tape, as this can compromise its effectiveness. Continue wrapping until you reach the end of the threads, then tear or cut the tape to finish.
d. Smooth Out Wrinkles: Once the tape is applied, use your fingers to smooth out any wrinkles or bubbles. This will ensure a tight seal and prevent water from seeping through gaps in the tape.
FAQ
- Why is my bathtub faucet leaking?
- A leaky bathtub faucet can be caused by various factors, including worn-out washers, faulty cartridges or valves, mineral deposits, or loose connections. Identifying the specific cause of the leak is essential for determining the appropriate repair method.
- Can I fix a leaky bathtub faucet myself?
- Yes, in many cases, fixing a leaky bathtub faucet is a DIY-friendly task. With the right tools and instructions, you can often address the issue without the need for professional assistance. However, if you’re unsure about the repair process or encounter complications, it’s always best to seek expert guidance.
- What tools do I need to fix a leaky bathtub faucet?
- Essential tools for fixing a leaky bathtub faucet include an adjustable wrench, screwdrivers, plumber’s tape, replacement washers or cartridges (depending on the faucet type), and a flashlight for inspection. Having these tools on hand will help you tackle the repair efficiently.
- How do I know if I have a compression or cartridge-style faucet?
- One way to identify the type of faucet you have is by examining the handle mechanism. Compression faucets typically have separate hot and cold handles that require multiple turns to open or close. Cartridge faucets, on the other hand, often have a single handle that moves up and down or rotates to control both temperature and flow.
- What should I do if the leak persists after attempting to fix it?
- If the leak persists after attempting DIY repairs, it may indicate underlying issues that require professional attention. Consider consulting a licensed plumber who can diagnose the problem accurately and recommend appropriate solutions. Ignoring persistent leaks can lead to further damage and increased water bills, so it’s essential to address them promptly.
What’s next?

Thank you for taking the time to read this blog. I hope you found the information and tips helpful.
Stay tuned for more informative articles and guides on kitchen mastery here at kitchenmasteryblog.com. We’ll be covering a wide range of topics, from knife skills to culinary techniques and everything in between.
We look forward to welcoming you back soon for more valuable insights and expertise to elevate your culinary journey. Happy cooking, and see you again on our next blog!